How to Use KT Tape for Morton's Neuroma: Taping Tips
If you’ve ever felt like there’s a pebble stuck under the ball of your foot—especially when walking or running—you might be dealing with Morton’s neuroma. This frustrating condition can make every step painful, and many people struggle to find effective relief.
While custom orthotics and footwear changes help, KT tape has become a popular option to ease pressure and reduce pain. In this guide, you’ll learn how to use KT tape for Morton’s neuroma, from preparation to proper taping techniques—so you can get back to moving comfortably.
Understanding Morton’s Neuroma
What is Morton’s Neuroma?
Morton’s neuroma is a painful foot condition that affects the nerves between your toes, most often between the third and fourth toes. When the tissue around these nerves thickens, it creates sharp pain, tingling, or burning sensations in the ball of your foot.
Causes of Morton’s Neuroma
Several factors can lead to Morton’s neuroma, including:
- Wearing tight or narrow shoes (especially high heels)
- Repetitive stress from running or high-impact sports
- Foot deformities like flat feet or high arches
- Abnormal foot mechanics, like excessive pronation
Symptoms and Common Complaints
People with Morton’s neuroma often describe symptoms like:
- Feeling like you’re stepping on a marble or folded sock
- Sharp pain that radiates to your toes
- Burning or tingling between your toes
- Symptoms that worsen with activity and improve with rest
Why Taping Can Help
KT tape works by offloading pressure from the affected nerve and supporting your foot’s natural structure. When applied correctly, it gently lifts the skin and fascia, improving circulation and reducing pain signals—making it a helpful, low-risk option to manage discomfort.
What is KT Tape?
Brief Overview of KT Tape
KT tape (short for kinesiology tape) is a stretchy, breathable tape designed to support muscles, tendons, and ligaments without restricting movement. Originally popular in sports, it’s now widely used for pain relief and injury recovery across different conditions—including foot problems like Morton’s neuroma.
Benefits of KT Tape for Foot Issues
KT tape is particularly helpful for foot conditions because it:
- Provides lightweight support without limiting flexibility
- Improves circulation, which may reduce inflammation
- Encourages better foot positioning and alignment
- Offers drug-free, non-invasive pain relief
Why KT Tape is Popular for Morton’s Neuroma
For Morton’s neuroma, KT tape offers targeted support right where you need it—across the forefoot and toes. It’s also:
- Easy to apply at home
- Comfortable to wear inside morton neuroma shoes
- Affordable compared to custom orthotics or ongoing treatments
Preparing to Apply KT Tape for Morton’s Neuroma
Supplies You’ll Need
Before you begin, gather these supplies:
- A roll of high-quality KT tape (choose pro or gentle if you have sensitive skin)
- Small scissors for cutting the tape
- Alcohol wipes to clean your foot
- Optional: skin-prep spray if you sweat a lot
Choosing the Right KT Tape (Regular vs. Pro vs. Gentle)
- Regular KT tape: Good for short-term use (up to 2 days)
- KT Tape Pro: Stronger adhesive for athletes or active users (stays up to 4 days)
- Gentle KT Tape: Best for sensitive skin, but may not last as long
Prepping Your Foot (Skin Preparation and Cleaning)
Clean skin makes a big difference in how well the tape sticks. Follow these steps:
- Wash your foot with soap and water, removing lotion or oils
- Dry thoroughly, especially between toes
- Use alcohol wipes for extra grip
- Trim any excess hair if needed
Common Mistakes to Avoid Before Taping
- Applying tape to damp or sweaty skin
- Using too much stretch (this can irritate the skin)
- Taping directly over blisters or open wounds
- Ignoring foot positioning while applying (keep foot relaxed and slightly flexed)
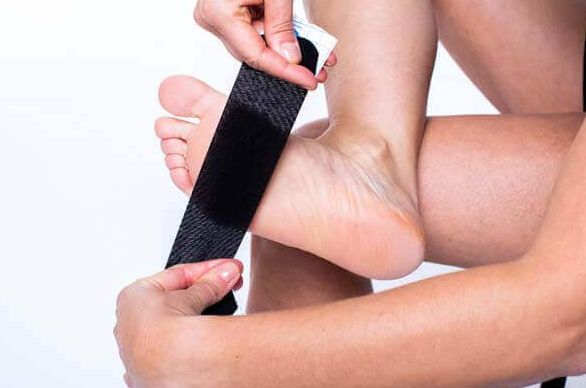
Step-by-Step Guide: KT Taping Techniques for Morton’s Neuroma
When it comes to taping for Morton’s neuroma, the goal is simple: reduce pressure on the nerve while supporting your foot’s natural shape. The right KT taping technique can make a big difference in how your foot feels throughout the day.
Technique 1: Metatarsal Arch Support Taping
This technique focuses on lifting the arch and spreading the metatarsal bones to relieve pressure around the nerve.
How to apply:
- Start with a strip of KT tape about 6-8 inches long.
- Anchor the tape on the outside edge of your foot, near the ball.
- Stretch the tape slightly as you wrap it under your foot’s arch and across the top.
- Finish by smoothing both ends down without stretch.
When to use: Ideal if your pain worsens while standing or walking barefoot.
Technique 2: Forefoot Offloading Taping
This method helps take pressure off the ball of your foot, where Morton’s neuroma pain often flares up.
How to apply:
- Cut a strip of tape long enough to wrap around the front of your foot.
- Start on the top of your foot, just behind your toes.
- Wrap the tape snugly around, crossing underneath your foot, but avoid taping too tightly.
- The goal is to slightly lift the skin under your forefoot to improve circulation.
Best for: People who wear narrow shoes or experience sharp, localized pain.
Technique 3: Combined Arch and Neuroma Relief Taping
This combines the benefits of both techniques, offering full foot support and targeted relief at the pain point.
How to apply:
- Apply the metatarsal support strip first.
- Add a second piece directly over the most painful spot, using gentle stretch to lift and decompress the area.
Great for: Long days on your feet, especially if you’re active or need extra support.
Technique 4: Direct Pain Point Application
This technique works when you need focused relief, especially if pain is radiating into your toes.
How to apply:
- Cut a small piece of tape (about 3-4 inches).
- Place the tape directly over the tender spot, adding a slight stretch in the middle.
- Secure the ends with no stretch to avoid irritation.
Use this if: You need a quick fix for sharp, sudden flare-ups.
Best Practices for Effective Taping
Even the best taping technique won’t help if the tape doesn’t stay put—or if it’s applied incorrectly. Here’s how to get the most out of your KT tape for Morton’s neuroma.
Proper Tape Tension and Stretch
KT tape should support, not squeeze. Too much stretch can irritate your skin or worsen pain. Use just 25-50% stretch for foot taping—this provides enough lift without cutting off circulation.
Positioning Your Foot Correctly
The position of your foot when applying tape matters. Sit comfortably with your foot resting flat, but keep it slightly flexed (toes pointed upward). This mimics your foot’s natural shape while standing.
How Long to Leave the Tape On
KT tape is designed to stay put for up to 3-5 days, even during showers. However, if you notice peeling edges or skin irritation, remove it sooner. For sensitive skin, 24-48 hours may be a safer limit.
Re-Taping Frequency and Foot Care Between Applications
After removing the tape, give your skin a break for a few hours before reapplying. Moisturize if needed, but avoid lotion right before taping.
Pro tip: Alternate tape patterns or positions slightly to prevent skin irritation over time.
Combining KT Tape with Other Treatments
KT tape can be effective for managing Morton’s neuroma, but it works even better when combined with other simple treatments. Think of taping as part of a complete care plan, not a standalone fix.
Footwear Modifications
Your shoes matter—a lot. Choose shoes with:
- Wide toe boxes to avoid crowding your toes
- Low heels (high heels worsen forefoot pressure)
- Ample cushioning under the ball of your foot
Taping inside roomy, supportive shoes helps your tape do its job longer.
Orthotics and Insoles
Custom orthotics or over-the-counter metatarsal pads add an extra layer of relief by helping redistribute weight across your foot. Pairing these with taping can double your comfort.
Stretching and Strengthening Exercises
Taping reduces pain, but stronger feet recover faster. Simple exercises like toe spreads, calf stretches, and rolling your arch over a ball can improve foot strength and flexibility.
Pain Relief Strategies
If your pain flares up despite taping, you’re not alone. Many people also use:
- Ice packs after long days
- Short-term anti-inflammatory medications (check with your doctor)
- Massage to ease tightness around the neuroma
Common Problems and Troubleshooting
Even if you follow the instructions perfectly, things don’t always go as planned. Here are common taping issues—and how to fix them.
Tape Not Sticking Well
This is one of the most frequent complaints. It often happens because:
- Skin wasn’t cleaned properly (oils or lotion left behind)
- You applied tape to damp or sweaty skin
- Foot movement caused edges to peel
Quick fix: Use an alcohol wipe before taping, and apply tape at least 30 minutes before activity to give the adhesive time to bond.
Skin Irritation or Allergic Reaction
Some people react to KT tape adhesive, especially if the tape stays on too long. Signs include:
- Redness, itching, or rash under the tape
- Skin peeling after tape removal
What to do: Try a gentle or hypoallergenic version of KT tape, and avoid taping over broken or sensitive skin.
Pain Not Improving After Taping
If your pain doesn’t improve—or gets worse—taping alone may not be enough. Morton’s neuroma can sometimes require:
- More structured orthotics
- Injections or other medical treatments
- Guidance from a podiatrist or physical therapist
When to Seek Professional Help
Taping helps many people, but it’s not a cure-all. See a foot specialist if:
- Your pain limits daily activities, even with taping
- You notice numbness or tingling spreading into your toes
- Taping provides little or no relief after several tries
Managing Morton’s neuroma can feel like a guessing game at first—but the right tools, like KT tape, can make a real difference. Before you grab your roll of tape, here are a few key reminders to help you succeed.
1. Clean Skin is Non-Negotiable
Adhesive struggles on sweaty, oily, or lotion-covered skin. Take the extra minute to clean your foot well before taping—and make sure it’s completely dry.
2. Tension Matters More Than You Think
Too tight, and you’ll cut off circulation. Too loose, and the tape won’t provide support. Practice a few times to find that “just right” stretch.
3. Don’t Expect Magic Overnight
Taping helps reduce symptoms, but it’s not a cure. Pair your taping with foot-friendly shoes, gentle stretches, and smart recovery strategies for the best results.
4. Pay Attention to Your Skin
Some people develop irritation or sensitivity to the adhesive—especially if the tape stays on too long. If you notice redness or itching, switch to a gentle formula or take breaks between applications.
5. Every Foot is Different
What works for someone else might not work for you—and that’s okay. Experiment with different taping techniques until you find the one that gives you the most relief.
Remember: KT tape is just one piece of the puzzle. For lasting relief, consider a full foot health plan that fits your lifestyle.
Conclusion
If Morton’s neuroma pain is slowing you down, KT taping offers a simple, affordable way to find relief without medication or invasive procedures. With the right technique, you can reduce pressure on the affected nerve, support your foot’s natural shape, and feel more comfortable with every step.
Whether you’re an athlete trying to stay active or someone who just wants to enjoy a pain-free walk again, KT tape can be a valuable tool in your self-care routine. Start small, practice your technique, and don’t be afraid to combine taping with other treatments like orthotics, best shoes, and gentle stretches.
If you’re unsure whether taping is right for you—or your symptoms aren’t improving—talk to a foot specialist for personalized advice. After all, your feet carry you through life—they deserve the best care you can give.
Ready to try taping for yourself? Grab your KT tape, follow the steps in this guide, and take the first step toward happier, healthier feet.
FAQs
Can You Wear KT Tape While Running or Exercising?
Yes, you can—KT tape is designed to stay put even during workouts. In fact, many runners and athletes rely on taping to keep foot pain under control during training.
Pro tip: For high-impact activities like running, use KT Tape Pro, which has stronger adhesive and stays secure even with sweat.
Is KT Tape Waterproof?
Most KT tape products are water-resistant, meaning they can handle showers, sweat, and short dips in water. However, soaking your feet (like in a bath or swimming pool) can weaken the adhesive faster.
To extend tape life, pat your foot dry after exposure to water instead of rubbing the tape.
How Long Does KT Tape Last on Feet?
On average, KT tape can stay on your foot for 3 to 5 days if applied correctly. But your activity level, skin type, and even the weather can affect its staying power.
If your skin is oily, sweaty, or you’re wearing tight shoes, the tape may peel off sooner.
Can KT Tape Replace Orthotics for Morton’s Neuroma?
For some people, taping works well enough on its own, especially for mild or occasional pain. However, if you have severe foot misalignment or chronic pain, taping may not fully replace orthotics.
Many podiatrists recommend combining KT tape with well-fitted orthotics for best long-term support—especially if you’re on your feet all day.
Recent Posts

How to Use KT Tape for Morton’s Neuroma: Taping Tips
How to Use KT Tape for Morton’s Neuroma: Taping Tips If you’ve ever felt like there’s a pebble stuck under