How to Tape Your Foot for Morton's Neuroma? Step-by-Step Guide
If you’ve been struggling with burning pain in the ball of your foot or that uncomfortable feeling of stepping on a pebble, you’re not alone. These are classic signs of Morton’s neuroma, a condition caused by a thickened nerve between your toes.
For many people, taping the foot becomes a simple, non-invasive way to ease discomfort, especially if you’re active or on your feet a lot. The right taping technique can help spread your metatarsal bones apart, reducing pressure on the irritated nerve.
In this guide, you’ll learn how to tape your foot for Morton’s neuroma, step by step, using techniques recommended by podiatrists and sports therapists. Whether you’re taping to stay comfortable at work, during a workout, or just to enjoy a pain-free walk, this method can make a big difference.
Understanding Morton’s Neuroma and Its Causes
What is Morton’s Neuroma?
Morton’s neuroma is a painful nerve condition that affects the area between your third and fourth toes. It happens when the nerve tissue thickens, often due to repeated irritation, pressure, or compression. This thickening leads to symptoms like:
- Sharp, burning pain in the ball of the foot
- Tingling or numbness in the toes
- Feeling like you’re walking on a fold in your sock
What Causes Morton’s Neuroma?
Several factors can trigger or worsen this condition:
- Tight, narrow shoes that squeeze the toes together (especially high heels)
- Repetitive stress from running, jumping, or certain sports
- Foot deformities like flat feet, high arches, or bunions
- Previous injury that changes foot mechanics
How Taping Can Help
Taping works by spreading the bones in your forefoot apart. This reduces compression on the irritated nerve and allows it to rest. When done correctly, taping can also:
- Support your arch to distribute pressure evenly.
- Encourage better foot alignment during movement.
- Prevent further irritation during physical activity.
Many people find that taping works best when combined with proper footwear, cushioning, and activity modifications. While it’s not a cure, it can be a powerful tool for pain management, especially when you need to stay mobile.
Materials You Will Need
Before you start taping, gather these essential supplies. Choosing the right materials ensures your tape stays in place and provides effective support.
Types of Tape
There are two main options for foot taping:
- Athletic tape: Stiff and supportive, ideal if you need strong stabilization during sports.
- Kinesiology tape: Flexible and skin-friendly, perfect for all-day wear, allowing more natural movement.
Choosing the Right Tape for Morton’s Neuroma
- If you need rigid support for intense activities, go for athletic tape.
- If you want gentle support for daily use, kinesiology tape works well.
- For sensitive skin, choose hypoallergenic tape to avoid irritation.
Additional Supplies
Along with tape, you may want to have:
- Scissors to cut precise strips.
- Pre-wrap if you need a protective layer under the tape.
- Padding (like felt or gel pads) for extra cushioning under the ball of the foot.
Pro Tip: Test the tape on a small area of skin before full application to check for any skin reaction.
Preparing Your Foot for Taping
Before you start applying tape, preparation matters more than you might think. Clean skin, proper positioning, and a few smart extras can make a huge difference in how well the tape sticks — and how much relief you feel.
Clean and Dry Your Skin
Start by washing your foot with mild soap and warm water. This removes sweat, oils, and dirt that could cause the tape to peel off too soon. Once clean, pat your foot completely dry. Moisture is one of the biggest reasons tape doesn’t hold properly.
Position Your Foot Correctly
Sit in a comfortable position where you can easily reach your foot. Your foot should rest flat, with your toes pointing straight ahead. A neutral position helps ensure you’re taping for natural alignment, not accidentally pulling your foot into a strained angle.
Apply Pre-Wrap or Padding (Optional)
If your skin is sensitive or prone to irritation, applying a thin layer of pre-wrap can protect the skin. You can also place a soft pad directly under the ball of your foot to cushion the nerve even further. This is especially helpful if you’ll be walking or exercising after taping.
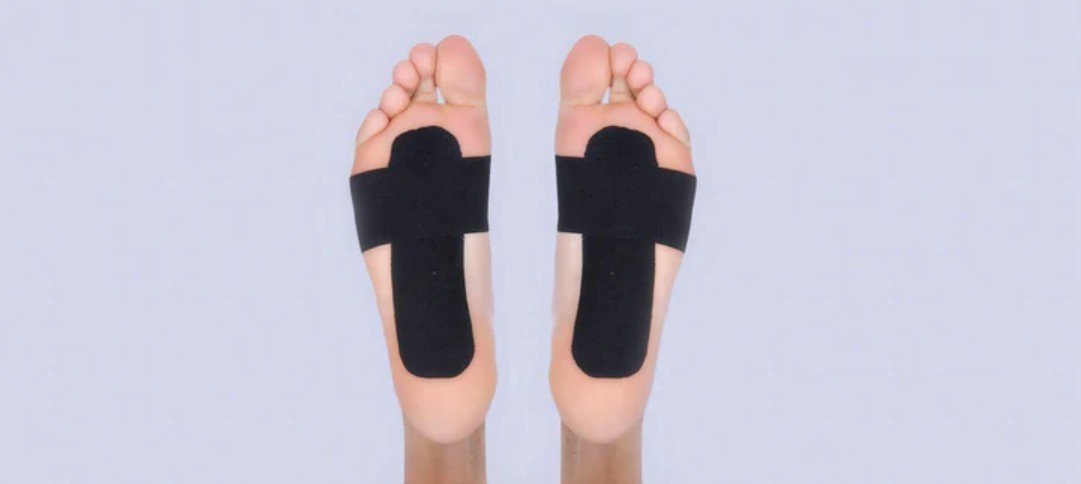
Step-by-Step Taping Instructions
Now that your foot is prepped, let’s walk through exactly how to tape for Morton’s neuroma relief. This method is designed to spread your metatarsal bones apart, reducing pressure on the irritated nerve.
Step 1: Apply Anchor Strips
Start by wrapping a strip of tape around the widest part of your forefoot—just below your toes. This acts as the foundation for everything that follows.
Important: Keep the tape snug, but not so tight that your skin bulges over the edges or your toes turn cold.
Step 2: Create a Supportive Loop
Next, apply another strip that wraps around the ball of your foot, crossing over the area between your third and fourth toes (where Morton’s neuroma pain often occurs).
This loop should gently lift and spread the bones, easing pressure on the nerve.
Step 3: Add Cross Strips for Extra Stability
To prevent the tape from shifting, apply two criss-cross strips over the ball of your foot. These strips work like a seatbelt, keeping your foot stable during movement.
The goal is to hold the metatarsals apart while still allowing some natural flex when you walk.
Step 4: Optional – Arch Support Wrap
If you have flat feet or your arch tends to collapse, add a support strip along your arch. This strip should run from the inside of your foot to the outside, right across the arch.
This helps distribute pressure evenly across the foot, reducing extra strain on the nerve.
Step 5: Secure and Test
Finally, check for comfort and circulation. Your toes should still move easily, and there should be no numbness or tingling caused by the tape itself.
Take a few steps — does the tape stay in place? If it rolls up or feels too tight, adjust and reapply as needed.
Common Mistakes to Avoid
Even a simple taping method can backfire if you’re not careful. These are some common errors people make when taping for Morton’s neuroma — and how to avoid them.
Wrapping Too Tightly
Tighter isn’t always better. If your tape is cutting into your skin or causing tingling in your toes, you’ve likely overdone it. Taping should support, not strangle your foot.
Missing the Right Spot
The goal of taping for Morton’s neuroma is to relieve pressure between the metatarsals, not just compress the whole foot. Make sure your loop and cross strips focus right over the painful nerve (usually between the third and fourth toes).
Using the Wrong Type of Tape
Athletic tape offers rigid support, but if you need all-day comfort, kinesiology tape may be a better fit. Choosing the wrong type could mean your tape won’t stay put, especially if you’re active.
Skipping Preparation
Dirty, oily skin is a recipe for tape peeling off mid-day. Taking time to clean, dry, and optionally pre-wrap your foot helps your tape last longer and work better.
Tips for Best Results
Taping can be a game changer for managing Morton’s neuroma, but how and when you tape matters. Here are practical tips to make your taping more effective.
When to Apply Tape
- Before long walks or workouts
- First thing in the morning if you have daytime foot pain
- After icing or resting to keep swelling down
Combine Taping with Other Treatments
Taping works best alongside other supportive measures like:
- Wearing wider, supportive shoes with plenty of toe room
- Using a metatarsal pad inside your shoe
- Avoiding high heels or narrow footwear
Many podiatrists recommend taping in combination with orthotics, especially for chronic cases.
How Long to Wear the Tape
Most people find 8-12 hours is comfortable. After that, the tape can lose tension or irritate the skin. Remove it at night to let your skin breathe.
When to Re-Tape
If the tape starts peeling or loses its supportive feel, it’s time to reapply. And if you notice increased pain or redness, take a break and check in with a professional.
When to Avoid Taping
While taping can offer great relief for Morton’s neuroma, there are times when it’s best to skip it. Understanding these situations can help you avoid making things worse.
Skin Sensitivity or Allergies
If you have a known allergy to adhesive tape or sensitive skin that reacts easily, taping may cause rashes, blisters, or irritation. In these cases, you might want to try:
- Hypoallergenic tape, designed for sensitive skin.
- A thin layer of pre-wrap under the tape to protect your skin.
Open Wounds or Infections
Taping over broken skin or an existing infection can trap moisture and bacteria, making things worse. If you have cuts, blisters, or athlete’s foot, let the area heal before taping.
Severe or Unexplained Symptoms
If your foot pain is getting worse instead of better, or if you notice spreading numbness, swelling, or discoloration, it’s time to pause taping and see a podiatrist. Sometimes, what feels like Morton’s neuroma can actually be a different foot issue that needs specialized care.
After Extended Wear
Taping is not meant to stay on 24/7. Leaving tape on for too long can irritate skin and affect circulation. It’s important to remove tape at night and give your skin a chance to breathe.
Soft Reminder: Taping is helpful for short-term relief, but if your symptoms persist or worsen, a professional evaluation is key.
Alternative Methods for Foot Support
Taping isn’t the only option for managing Morton’s neuroma. In fact, many people find combining taping with other foot-friendly solutions brings the best results. If you’re looking for alternatives or extra support, here’s what to consider.
Metatarsal Pads
These small gel or foam pads sit inside your shoe, right under the ball of your foot. They work by lifting and separating the metatarsals, which takes pressure off the nerve. They’re affordable, easy to use, and work well alongside taping—or on their own for everyday wear.
Custom Orthotics
If your foot structure (like flat feet or high arches) is contributing to your neuroma, custom orthotics can help correct alignment and reduce nerve compression. A podiatrist can create orthotics tailored to your exact foot shape and needs.
Proper Footwear
Shoes play a huge role in neuroma management. The right pair should have:
- A wide toe box to avoid squeezing your toes together.
- Good arch support to prevent excessive pressure on the ball of your foot.
- Cushioning under the forefoot for extra shock absorption.
Tight, pointed shoes or high heels tend to worsen neuroma symptoms, so swapping to supportive footwear can make a real difference.
Physical Therapy
In some cases, foot exercises that improve flexibility, strengthen supporting muscles, and correct gait patterns can help take pressure off the nerve. A physical therapist can teach you targeted moves to improve foot mechanics.
When to Seek Professional Advice
If at-home treatments aren’t cutting it, or if your pain is severe and persistent, a podiatrist can recommend medical options like:
- Corticosteroid injections to reduce inflammation.
- Shockwave therapy to stimulate healing.
In rare cases, surgery to remove the thickened nerve tissue.
FAQs
Can taping actually cure Morton’s neuroma?
Taping is not a cure, but it can significantly reduce pain and pressure on the affected nerve. Think of it as a helpful tool to manage symptoms, especially during activity or long days on your feet. For long-term improvement, combining taping with proper footwear, stretching, and other treatments works best.
How often should I tape my foot?
This depends on your lifestyle and pain level. If you’re on your feet all day or doing activities that aggravate your neuroma, taping before those moments can help. Most people find taping daily or before exercise offers the best support. Just be sure to give your skin breaks to avoid irritation.
Is kinesiology tape better than athletic tape for Morton’s neuroma?
Both can work, but they offer different benefits:
- Athletic tape provides firm, rigid support, holding your foot in place.
- Kinesiology tape offers gentler support and allows for some movement, making it more comfortable for all-day wear.
If you need maximum support (for running or hiking), athletic tape may be better. For daily wear in shoes, kinesiology tape is often more comfortable.
Can I tape my foot for running or sports?
Yes! In fact, many runners and athletes with Morton’s neuroma rely on taping to stay active without pain. Just make sure the tape is secure and your shoe fits comfortably over the taped foot. Some runners also use metatarsal pads alongside taping for extra cushioning.
How do I know if I’m taping correctly?
The best sign is comfort and relief. When taped properly, you should feel:
- Less burning or tingling under the ball of your foot.
- Improved toe spread, reducing pinching between the metatarsal bones.
- Gentle support, without cutting off circulation.
If your toes feel numb, cold, or painful, the tape may be too tight or placed incorrectly.
Conclusion
Taping your foot for Morton’s neuroma is a simple but powerful technique that many people find incredibly helpful. By offloading pressure from the nerve and offering targeted support, taping can help you stay active with less pain—whether you’re walking around town, working long shifts, or enjoying your favorite sport.
The key is to tape consistently, use proper technique, and combine it with smart foot care choices, like supportive shoes and gentle stretching. If you’re new to taping, don’t worry—it might take a few tries to get the tension and placement just right. But once you find what works, it can become a quick and reliable part of your foot care routine.
A Quick Reminder: Taping is great for managing symptoms, but if your pain is severe, persistent, or worsening, don’t hesitate to reach out to a podiatrist. They can help diagnose the issue fully and recommend other treatments if needed.
If you’re ready to give taping a try, grab your tape, follow the steps, and see how your foot feels. Many people are surprised by just how much this small change can improve their daily comfort.
Recent Posts

How to Tape Your Foot for Morton’s Neuroma? Step-by-Step Guide
How to Tape Your Foot for Morton’s Neuroma? Step-by-Step Guide If you’ve been struggling with burning pain in the ball